


This beautiful traditional origami bird is actually quite easy to make,
and if you fold the feet at just the right angle, it will stand up!
For the best looking bird, you can use paper thats coloured on both sides:
but white on the bird still looks nice if you dont have any double sided paper.
For a printable .pdf version of the bird instructions, click here.
You will need Adobe Reader installed on your computer in order to
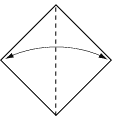
1. Start with your paper white side up. Fold in half, as shown.
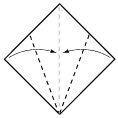
2. Fold the outside corners into the centre line, and crease well.
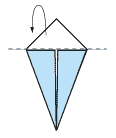
3. Fold the top triangle backwards
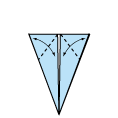
4. Fold the corners of the model in
toward the centre, crease well, then
open again.
4. Fold the corners of the model in
toward the centre, crease well, then
open again.
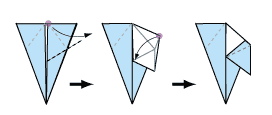
5. Bring the highlighted corner up and outward using the crease shown. Then bring the highlighted corner back down toward the centre line and flatten.
6. Repeat this step on the opposite
corner... the model should now look
like this
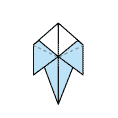
7. Fold the outermost corners backwards on the angle shown and crease well.
corner... the model should now look
like this
7. Fold the outermost corners backwards on the angle shown and crease well.
8. Mountain fold the model in half. (Fold backwards)
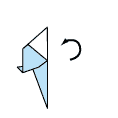
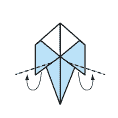
9. Rotate the model slightly so you can see the bird forming
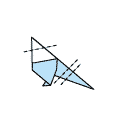
10. Make these creases and unfold

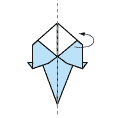
11. Using these creases, inside reverse fold to
make the head and the tail of the bird.
If you have folded the feet at the correct angle (in step 7), the model should stand up.
You can refold the feet if you need to.
10. Make these creases and unfold
11. Using these creases, inside reverse fold to
make the head and the tail of the bird.
If you have folded the feet at the correct angle (in step 7), the model should stand up.
You can refold the feet if you need to.
No comments:
Post a Comment