About Me

My photo
Vermont
Check my shop on Etsy. http://www.etsy.com/shop/UpcycleRecycleReuse

Search This Blog

Showing posts with label DIY. Show all posts

Saturday, December 1, 2012

Washi tape Birdhouse


What about a little DIY birdhouse with washi tape; Easy,quick and so pretty!

Grab a little birdhouse (wood, craft paper will work)some white paint
Your favorite washi tapes
small scissors
and modpodge for the finish (optional)

and in less than an hour, get ready to make a precious little decoration!


Tuesday, November 20, 2012

DIY Screenprint Dodger Tee

DIY Screenprint Dodger Tee

awesome textile diy's 
 A Beautiful Mess' hand stamped dress, a bleach painting tutorial by Lune via A Beautiful Mess. I thought I'd give this screenprint diy, that I saw over at Manzanita, here's my take on this awesome and totally easy project. Here's what you need:
Shirt (thrifted), modge podge, fabric paint (this was my first time using  all-purpose acrylic paint and it's amazing!), design, cardboard piece, embroidery hoop, nylon or panty-hose fabric, paintbrush, and permanent pen.
1. Create a design for your screenprint. I started with something simple since it was my first time using this method. Later, I did a more elaborate design for the front of the shirt, after I did this first heart as practice. Make sure that your that your embroidery hoop is large enough for your design.
2. Stretch the nylon over the hoop so that it is taut.
3. Trace your design using a a permanent pen.
4. Using Mod Podge, paint the "negative space", or, the space that you do not want to be painted.
5. Fill in the whole area, making sure there are no holes or gaps. I was obsessive about this because I didn't want the paint to seep through. Let dry completely. It took about 3 hours for this little one to dry.
6. Lay the hoop flat on the shirt and position where you want the design to be, and place a piece of cardboard beneath the area so that the paint doesn't bleed through the back. Squirt a generous amount of paint over the design.
7. Use the cardboard to spread the paint over evenly.
8. Carefully lift the hoop off the shirt and voila!
9. Let the paint dry completely before wearing.
I also did the front part of the shirt. I made the LA symbol inside a heart. I thought it came out cute and I'm excited to wear it to the game! Go Dodgers!
A few people have commented asking me how I made the design on the front. Here's a picture of the screen I made to create it. I painted Mod Podge on the outside of the heart, and the block letters, basically anywhere I didn't want the paint to go. So you kinda have to think in reverse. Hope this helps!

Wednesday, October 24, 2012

Upcycled Stocking Stuffers for the KIDS

Old crayons lying around? Melt them to make new fun crayons for Christmas!

Have lots of crayon stubs that are too small to hold on to? Don't throw them out! You can use them to create big, chunky crayons – and your kids can help.


I used a silicone chocolate mold for the above. My observation on the Muffin tin is the crayons can be too big for little hands. Use what makes sense for you oven safe container. Lots of fun shapes are available for chocolate molds.

 Directions:
  1. Gather up all of your broken crayons, and cut them into small pieces. (An adult will need to complete this step.)
  2. Preheat the oven to 250 degrees.
  3. Fill the muffin tin with an inch-thick layer of crayon pieces.
  4. Bake 15-20 minutes, or until the wax is melted.
  5. Allow the tin to cool; then pop out the crayons, and they're ready for use.

Tips:

  1. If you don't have a muffin tin to devote to crayon making, you can line your regular muffin tin with foil cups.
  2. Candy and soap making molds can also be used to create fun, shaped crayons.
  3. Recycled crayons make a great no-cost gift or party favor.

Wednesday, October 10, 2012

Upcyceld Tin Cans - Art inspired


We all use some canned foods from time to time.  And we all probably use empty cans for one purpose or another.  This inscrutable shows how to decorate cans to be used as organizers for pencils, pens, paint brushes, etc.  It's a simple thing to do, and children would especially have fun making their creations.

Can Art: A Way To Recycle Some Tin Cans


1.      Prime the cans so the glue sticks
2.   Make the tiles. I painted Styrofoam and cut it into tile shapes. (Use whatever you have at hand.)
3.      Glue tiles to primed can
4.      Grout spaces between tiles and wipe off excess.

Tutorial:
http://www.instructables.com/id/Can-Art-A-Way-To-Recycle-Some-Tin-Cans/#step1

Tuesday, August 7, 2012

DIY home decor - recycle


Empty bottles and pots


Amazing candle holders and vases, made from bottles and vessels from yogurt!
Υπέροχα κηροπήγια και βαζάκια, από μπουκάλια και δοχεία γιαουρτιού!


Have you eaten your yogurt and drunk your wine and you have bottles and vessels left
over’s? Wrong… you have simple materials that can decorate your house
corners, by just using your imagination.
Beautiful candle holders from yogurt’s earthen vessels and small vases from bottles!
Φάγατε το γιαουρτάκι ή ήπιατε το κρασάκι σας και σας περίσσεψαν σκουπίδια; Λάθος… σας
περίσσεψαν απλά υλικά που μπορούν με λίγη φαντασία να ομορφύνουν γωνιές του σπιτιού
σας. Όμορφα κηροπήγια από πήλινα γιαουρτιού και μικρά βάζα με μπουκάλια!

You will need:
✂Knitting yarn
✂Scissors
✂Bottle
✂Clay yogurt’s vessel
✂glue
θα χρειαστείτε:
✂ κλωστές πλεξίματος
✂ ψαλίδι
✂ παχύρευστη κόλλα
✂ μπουκάλια
✂ πήλινο δοχείο γιαουρτιού
 
Put some glue vertically, in a few points of the vessel. Start from the bottom and  put the thread around the vessel or the bottle. Continue putting the yarn around and stop when the vessel looks as colorful as you want. 
 .
Βάζουμε κόλλα κάθετα σε αρκετά σημεία του πήλινου. Ξεκινάμε από τη βάση του και κολλάμε
τη κλωστή πλεξίματος γύρω γύρω! Συνεχίζουμε να κολλάμε τη κλωστή μέχρι το σημείο που
θεωρούμε ότι είναι αρκετά «γεμάτο» το αντικείμενο μας.
 
Did you miss a spot? No problem. In that case you are using one kind of a thread, put glue and then put more thread on the gap. In case you want to create a design, you may cover the empty space with another kind of thread or another color.
.
Σας ξέφυγε σε ένα σημείο και κάνει κενό; Κανένα πρόβλημα. Αν έχετε σκοπό να χρησιμοποιήσετε ένα είδος κλωστής, απλά περάστε εκ νέου από πάνω. Αν θέλετε να κάνετε σχεδιάκια, μπορείτε να καλύψετε το κενό με άλλο χρώμα ή είδος κλωστής.

Just use your imagination and let yourself to create cute decorative with threads or with old textiles or cords.

Αφήστε τη φαντασία σας να οργιάσει και δημιουργείστε υπέροχα μικρά διακοσμητικά με κλωστές ή παλιά υφάσματα σε λωρίδες ή με σπάγκο.

Etsy Greek Street Team: DiY home decor - recycle empty bottles and pots:  

Monday, June 18, 2012

DIY Upcycled Fruit Basket

DIY Upcycled Fruit Basket
Fun Weekend Project!!!


DIY Grocery Bag Fruit Basket

 This basket, again made from a recycled, upcycled paper grocery bag, is a bit taller and without the handle, but could be a template for many other versions.
Grocery Bag Woven Basket


Grocery Bag Basket Tutorial


DIY paper basket

Though it is a natural fit for a fruit basket, this upcycled creation could be used in many ways; a gift basket of cookies, a flower basket, a basket to organize your desk. What a perfect use for your paper grocery bags!
DIY Paper basket decor ideas

Thursday, April 26, 2012

envelope templates - origami and more

Origami Envelopes

Making an easy origami envelope only takes a few minutes and a bit of practice. Once you master the art of a basic envelope, you can expand your repertoire to other kinds of envelopes and origami projects. Origami envelopes are perfect for sending notes and many other craft projects. You'll find that these little envelopes can be very useful, not to mention cute.

Blue envelopes

Origami Envelope Instructions

Here are simple steps to create your easy origami envelope.
  1. Place the square of paper with the pattern side down.
  2. Use your pencil to mark the middle of the paper. You can use your ruler to draw two faint lines and mark where they cross with a dot.
  3. Turn your piece of paper so you are looking at it diagonally.
  4. Fold in the two sides so that the points meet your center dot. Crease the fold.
  5. Fold up the lower point just above the point where the side flaps end. This will seal the bottom of your envelope and create a pocket.
  6. Unfold the envelope entirely, making sure to open the sides. Fold the lower point in half so it has a flat top.
  7. Bring the sides in on top of the folded bottom flap.
  8. Turn out the top of each side point until they meet flat top of the bottom flap.
  9. Open the side points out again and fold in the turned out parts. Reverse the crease that you just made so that the pattern shows on the inside.
  10. Tuck the flaps back over the bottom fold and crease all the folds well.
  11. The top flap will tuck inside of the pocket you've created. You can also use a sticker or dot of glue to seal the envelope on the outside.
Another easy origami envelope project is described in the Origami Envelope slideshow.

Or a more standard A2 Envelope Template


A2 Envelope Template


Material Ideas: creative alternatives
  • Comics
  • Newspaper
  • Wrapping paper
  • Lightweight cardstock
  • Magazines
  • Wallpaper samples
You should note that if you are planning to send your origami envelope through the post office, you'll need to meet certain requirements for size. The envelope needs to be at least 3 ½ inches high and 5 inches long.

Sunday, April 1, 2012

Birdhouses from Greeting Cards

Birdhouses from Greeting Cards

Photobucket

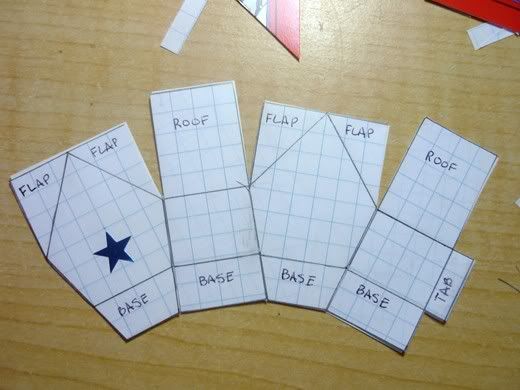
After I had made the greeting card village ornaments I decided that I wanted to make some birdhouse ones. Since the angles for these ones were not as straight forward I couldn't just score the patterns directly on the greeting cards. I made patterns with graph paper first.

If you'd like a pdf version of the pattern for my birdhouses you can click this link. (If you don't have access to a printer you can consult the pattern to draw your own. I drew the four sections of the house on 1/4 inch graph paper and then taped them together.)

After I had made the pattern I taped it to the back of the greeting card front. (This pattern will fit on any card that is larger than approximately 4 x 6 inches.) I took a sharp pin and poked some holes to indicate where the fold lines and the entrance would be. (One mark near either end of every fold line is sufficient.)
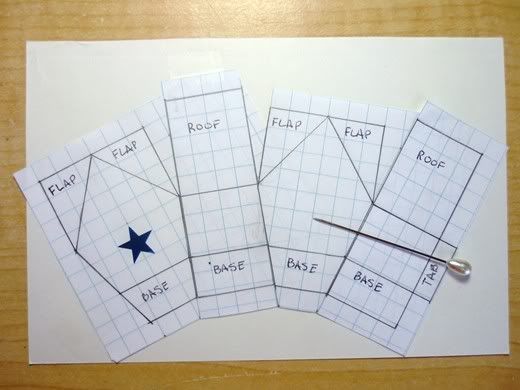
Photobucket

Then I cut around the pattern.

Photobucket

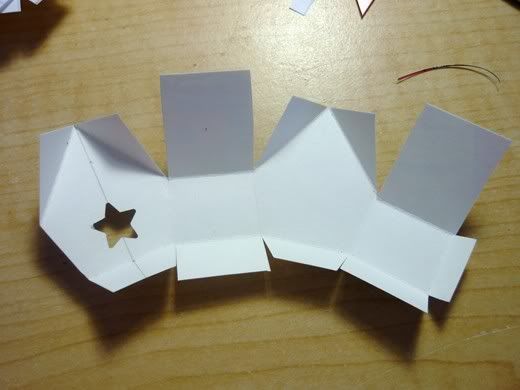
I scored all the fold lines and used a soft pencil to make a line to mark the centre line of the entrance. Then I punched the entrance ...
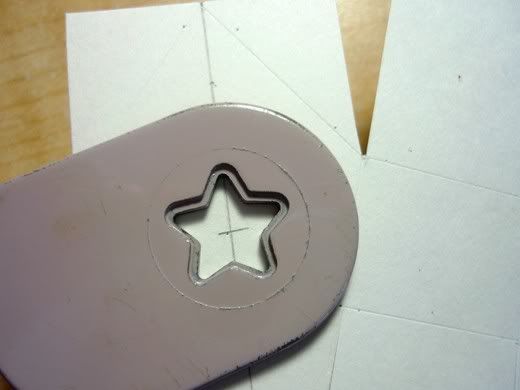
Photobucket

... creased all the fold lines ...

Photobucket

... and placed a piece of double sided tape on the tab.
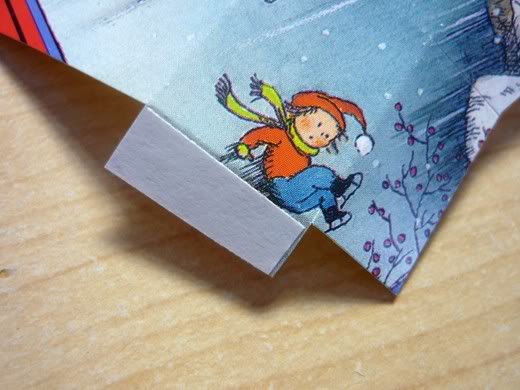
Photobucket

I rolled the house, removed the backing from the tape and stuck the tab to the inside of the front wall. (If I had used use glue instead of double sided tape I would have folded up one piece of the base and used something like a clothespin to clamp the tab to the front wall. Alternatively I could have eliminated the tab and used tape, like I did on the greeting card village ornaments.)
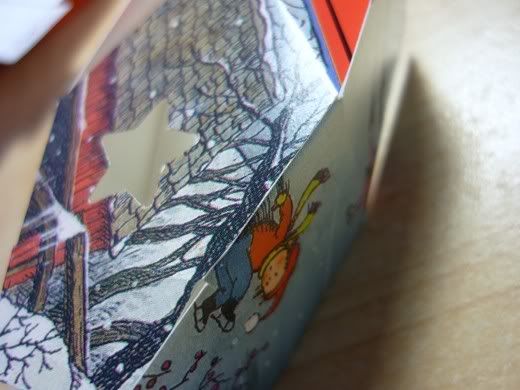
Photobucket

Next I assembled one side of the roof. I used double sided tape to attach the adjacent flaps to the roof piece. (Again if I had used use glue I would have used something like a clothespins to clamp the pieces together.)
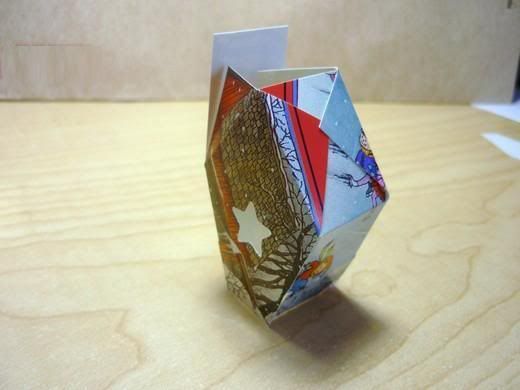
Photobucket

Then I attached the two remaining flaps to the other side of the roof. (If I had used glue I would have laid this side of the roof down on my work surface until the glue was set.)
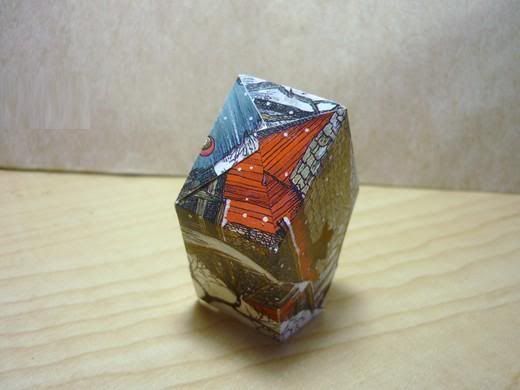
Photobucket

Next I assembled the base. I folded up the two rectangular pieces then used double sided tape to attach the other two pieces of the base. I inserted the handle of a small paint brush in the punched entrance to press the layers together.
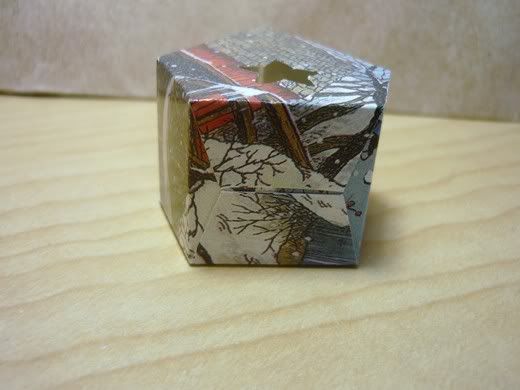
Photobucket

Then I was ready to assemble the outer roof. Because of the simple geometry I could have used my quilt ruler to score the pattern directly onto the back of the card, like I had on the greeting card village ornaments. Instead I taped, marked and cut out the pattern like I had the larger piece of the birdhouse.
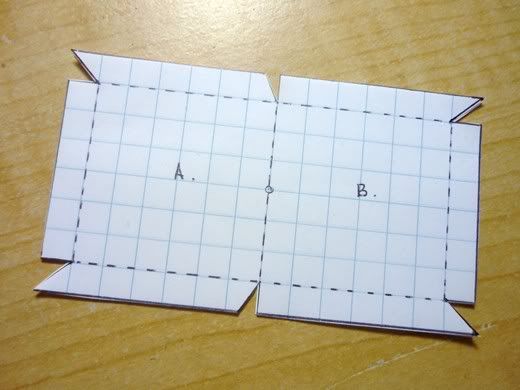
Photobucket

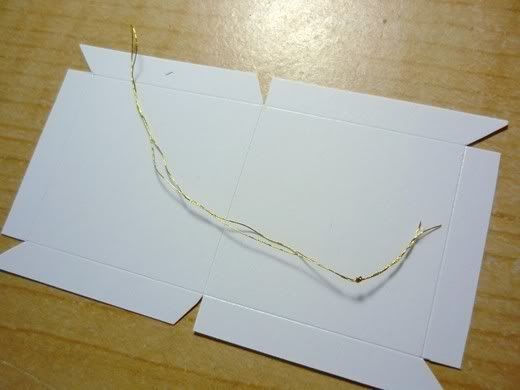
I scored the fold lines. Then I folded the hanging thread in half, knotted the two ends together ...
Photobucket

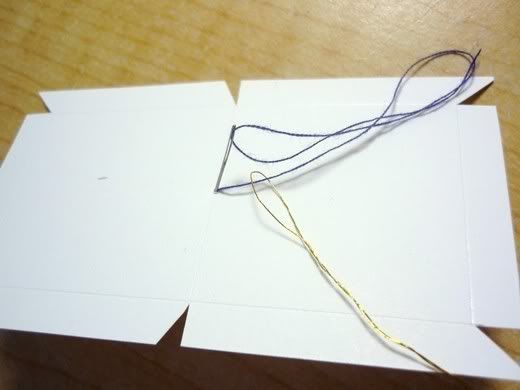
... and used a needle and thread to pull the folded end from the inside to the outside of the roof.
Photobucket

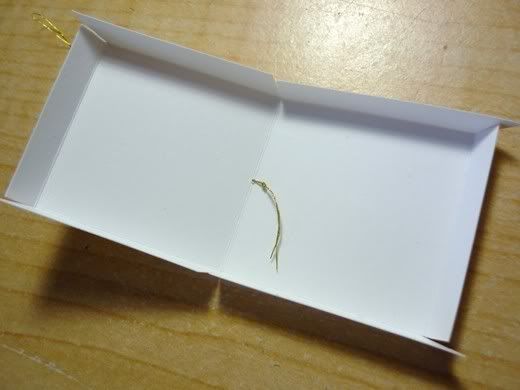
Next I creased the fold lines of the outer roof.
Photobucket

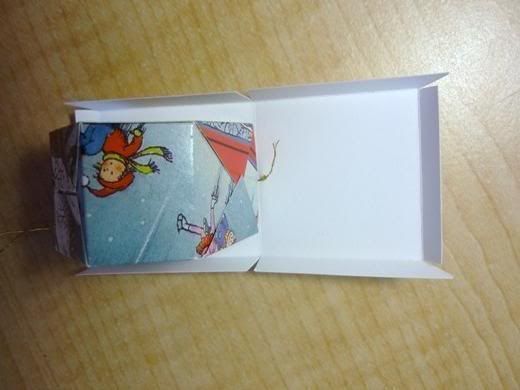
I applied some fast drying glue to one side of the house roof and gently laid it on Side A of the outer roof so that the roof peaks were together and the house was centred. (Side A has the notch at the centre front.) When it was in place I pressed the house against the outer roof. If I had used regular glue I would have left it laying like this until the glue was dry.
Photobucket

Then I applied glue to the other side of the house roof and pressed the remaining half of the outer roof in place. When the roof was in place there was a bit of the trim extending above the roof. I placed a spot of glue between the two pieces of trim on the front and pressed them together. Then I glued the two pieces of trim on the back of the birdhouse together.
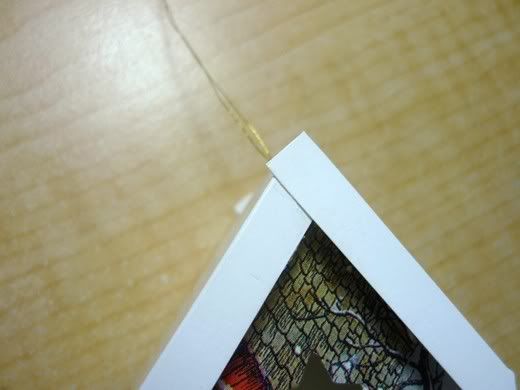
Photobucket

When the glue was set I used scissors to carefully cut the trim flat against the roof.
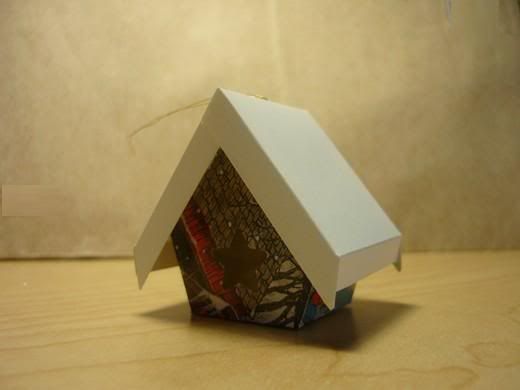
Photobucket

For this birdhouse I decided to add a bit of glitter to the roof. I painted some white glue on the surfaces of the outer roof and then sprinkled the glitter over the roof. When it was dry, and the excess glitter poured back into the container, it looked like this.
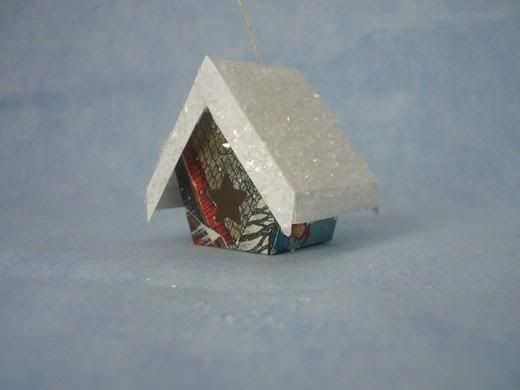
Photobucket

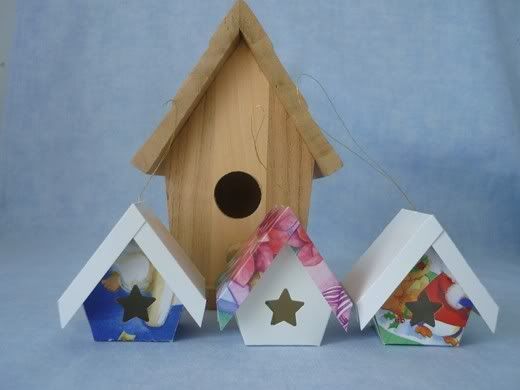
Most of the greeting card birdhouses I have made have had colourful (front of the greeting card) walls and a snowy white (back of the greeting card) outer roof. A birdhouse with white walls and a colourful roof can work well too.
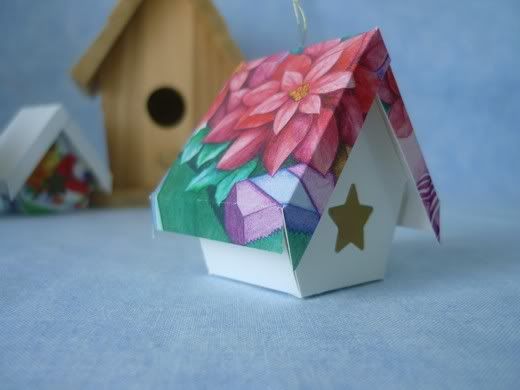
Photobucket

Note. I used the star shaped punch because it was the only one I had that was the right size. If I hadn't had my star punch here are some alternatives I would have tried. Going clockwise the green circle was cut from a greeting card, the small blue circle is a hole made with a regular hole punch, the red star is a sticker and the blue diamond is a hole cut with a mat knife. Another possibility is a 1/2 inch round sticker, which may be found where office supplies are sold.

Monday, February 13, 2012

bird origami - robin


This beautiful traditional origami bird is actually quite easy to make,
 and if you fold the feet at just the right angle, it will stand up!
For the best looking bird, you can use paper thats coloured on both sides:
but white on the bird still looks nice if you dont have any double sided paper.

For a printable .pdf version of the bird instructions, click here.
You will need Adobe Reader installed on your computer in order to
 open the .pdf file. You can get Adobe Reader here

 
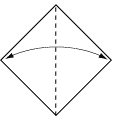
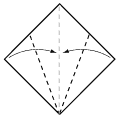
1. Start with your paper white side up. Fold in half, as shown.
 
2. Fold the outside corners into the centre line, and crease well.


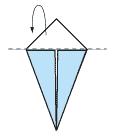
3. Fold the top triangle backwards


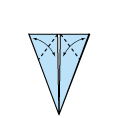
4. Fold the corners of the model in
toward the centre, crease well, then
open again.


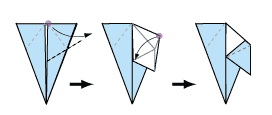
5. Bring the highlighted corner up and outward using the crease shown. Then bring the highlighted corner back down toward the centre line and flatten.
 
 6. Repeat this step on the opposite
corner... the model should now look
like this


 7. Fold the outermost corners backwards on the angle shown and crease well.


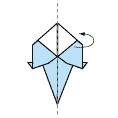
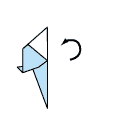
8. Mountain fold the model in half. (Fold backwards)
 

9. Rotate the model slightly so you can see the bird forming


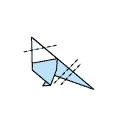
 10. Make these creases and unfold


11. Using these creases, inside reverse fold to
make the head and the tail of the bird.

If you have folded the feet at the correct angle (in step 7), the model should stand up.

You can refold the feet if you need to.