About Me

My photo
Vermont
Check my shop on Etsy. http://www.etsy.com/shop/UpcycleRecycleReuse

Search This Blog

Showing posts with label Upcycled fabric. Show all posts

Tuesday, November 20, 2012

DIY Screenprint Dodger Tee

DIY Screenprint Dodger Tee

awesome textile diy's 
 A Beautiful Mess' hand stamped dress, a bleach painting tutorial by Lune via A Beautiful Mess. I thought I'd give this screenprint diy, that I saw over at Manzanita, here's my take on this awesome and totally easy project. Here's what you need:
Shirt (thrifted), modge podge, fabric paint (this was my first time using  all-purpose acrylic paint and it's amazing!), design, cardboard piece, embroidery hoop, nylon or panty-hose fabric, paintbrush, and permanent pen.
1. Create a design for your screenprint. I started with something simple since it was my first time using this method. Later, I did a more elaborate design for the front of the shirt, after I did this first heart as practice. Make sure that your that your embroidery hoop is large enough for your design.
2. Stretch the nylon over the hoop so that it is taut.
3. Trace your design using a a permanent pen.
4. Using Mod Podge, paint the "negative space", or, the space that you do not want to be painted.
5. Fill in the whole area, making sure there are no holes or gaps. I was obsessive about this because I didn't want the paint to seep through. Let dry completely. It took about 3 hours for this little one to dry.
6. Lay the hoop flat on the shirt and position where you want the design to be, and place a piece of cardboard beneath the area so that the paint doesn't bleed through the back. Squirt a generous amount of paint over the design.
7. Use the cardboard to spread the paint over evenly.
8. Carefully lift the hoop off the shirt and voila!
9. Let the paint dry completely before wearing.
I also did the front part of the shirt. I made the LA symbol inside a heart. I thought it came out cute and I'm excited to wear it to the game! Go Dodgers!
A few people have commented asking me how I made the design on the front. Here's a picture of the screen I made to create it. I painted Mod Podge on the outside of the heart, and the block letters, basically anywhere I didn't want the paint to go. So you kinda have to think in reverse. Hope this helps!

Sunday, April 8, 2012

Upcycled Clothing - Poland


IMAGE OUTLOOK: Dominika Naziębły crafts a collection the upcycled way
A fashion designer by profession, Dominika Naziębły loves to craft clothes using upcycling. She used clothes that had been discarded and swaps them into fashionable forms by beautifully changing their character and quality. This graduate in fashion designing makes good use of whatever she learnt during her college days and crafts designs which are eye-appealing. IMAGE OUTLOOK has sustainable designs and consuming plus has been crafted in a tasteful manner.


upcycled dresses by dominika design


Friday, December 2, 2011

DIY Christmas Wreaths

 Eco-Friendly DIY Christmas Wreaths
 
Christmas is approaching fast and you are likely to be already trying to figure out how to make this year's holidays frugal and eco-friendly while still fun.

We save money and we love our home, therefore we love our DIY life!

So here are three totally green and pretty easy-to-craft DIY projects for you to decorate your home on a budget:

Find the instructions here

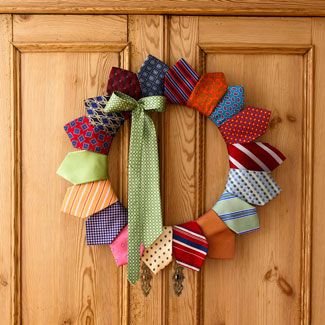
Old Ties into the Christmas Wreath

I am sure you have plenty of those ties your husband or dad doesn't need any more.
 Why not turn them into the fun Christmas decoration?

Old Ties into the Christmas Wreath 

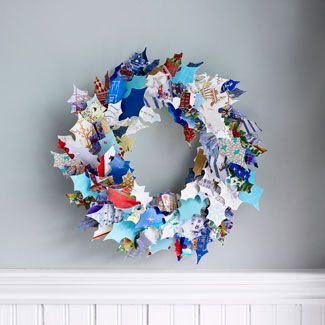
Holiday Greeting Cards into the Christmas Wreath

Recycle your friends' holiday greeting cards into holly leaves for this nice Christmas wreath!
 That's what I call putting good wished to real use!


holiday greeting cards Christmas wreath

Recycle Wine Corks into the Christmas Wreath

Holidays are so rich in wine, so this year you will know how to recycle them!


Wine Corks into the Christmas Wreath 


Pst, here are few more ideas to recycle festive wine corks:


Friday, November 18, 2011

Upcycled Fabric - Wine Sleeve

Wine Sleeve Steps
(Illustration By: Tim Lillis)

MATERIALS

Long-sleeved shirt with a hem at the wrist
2 cords for a drawstring
Needle and thread or sewing machine
Fabric scissors
Safety pin

DIRECTIONS

1. Choose a shirt.
Select a long-sleeved shirt with a hem around the wrist. The hem will become the casing for the drawstring.
2. Cut the sleeve.
Cut off the sleeve near the armpit. Most wine bottles are about 1 foot tall, so make sure you have a few extra inches.
3. Flip and sew.
Turn the sleeve inside out and stitch along the un-hemmed edge, sewing the edge shut. Then flip the sleeve back to the right side.
4. Cut slits for the drawstring.
Take your scissors and cut 2 small slits in the hem directly across from each other.
5. Create the drawstring.
Take one of your cords and attach a safety pin to the end. Thread the cord though the hemmed edge of the sleeve, beginning and ending at the same point. Remove the safety pin and double knot the ends together. Repeat with the second cord on the opposite side. Once you’ve secured the second cord with a double knot, pull the drawstrings away from each other, and you’ve created your wine pouch. Add your favorite bottle and enjoy.
Variation:
Cut the sleeve from a short-sleeved shirt to make a mini-pouch for holding a camera, art supplies, MP3 player, or other small objects.