About Me

My photo
Vermont
Check my shop on Etsy. http://www.etsy.com/shop/UpcycleRecycleReuse

Search This Blog

Showing posts with label repurpose. Show all posts

Wednesday, November 14, 2012

Hanging things doesn't have to be ugly.


Looking for a quick and simple gift? Something that doesn't require a lot of skill and needs no painting? These decoupaged hangers from Ashley at Make It and Love It are perfect for you. Using fabric, hangers from JoAnn's $1 bin and (because there is nothing better) Mod Podge, she whipped these up in no time.

Visit this post for the tutorial; don't forget that you can (and should!) use items from your stash and/or personalize for your recipient. By the way, yes, making hangers with my name on them is weird if there is no one in your house named Amy.

Also Check out

, &  .

Wednesday, November 7, 2012

Netherlands - Upcycled Wood


http://www.designbuzz.com/wp-content/uploads/2012/07/newspaper-wood_tqpRV_41416.jpg

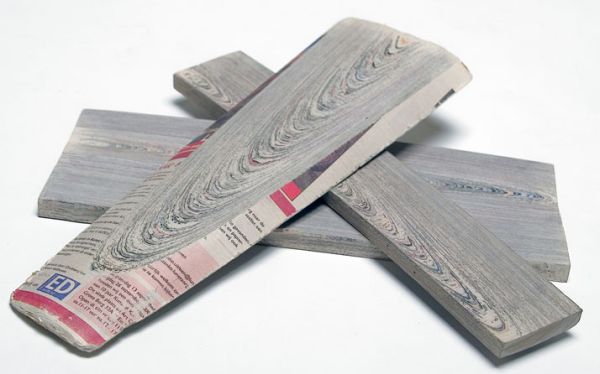
Dutch Designer makes wood out of Newspaper

The ordinary:
Wood has always been used to make paper, but, with new techniques and ingenuity, paper now becomes wood and utilized in different form in many products. The news paper is used as a raw material. Hard texture is given to these newspapers by recycling them and the recycled newspaper is used for making various products. Newspaper Wood is the unique way of using waste material and creating much exciting and useful products out of it. This process of up cycling is the new way to bring life to old dumped recyclable waste.

Inspiration:
A Dutch designer Mieke Meijer worked on this project in her workshop at Eindhoven, Netherlands. Her work is appreciated by a design firm Vij5 and they used this Newspaper wood in creating furniture pieces. Vij5 helped Mieke Meijer in implementing the vital processes into production and marketing. Her work was unnoticed for a period of four years. It was in Milan Design Week 2011, however, the furniture items of this wood were showcased. This process is time consuming, but the end result produce wood like material which has wood grains or rings of trees in a series of layers. It is the creativity of the designer that has transformed dumped newspaper piles into beautiful creations by a simple process of upcycling. Thus, saving the life of so many trees that can be cut down to make wooden items.
The extraordinary:
The newspaper wood created is eco friendly as it utilized the waste newspaper and is of great value. Special machines are used for compressing newspaper by rolling it very tightly to produce log of the size of tabloid. These tabloid logs are quiet similar to real wood in appearance.
The making:
Mieke Meijer, a graduate from the Design Academy Eindhoven made this concept of newspaper wood popular. Certainly, it’s her ideas and hard work that made it possible to create wood from recycled newspaper. The designer glued the stack of newspaper one by one and rolled it very tightly. The wood obtained is slightly deformed and can be sandpapered. So, the end product is the wood which can be cut or sanded and can be transformed into any product just like wood.

Source: http://www.designbuzz.com/dutch-designer-upcycles-discarded-newspaper-into-wood/

Tuesday, August 28, 2012

Paper Floral Ball - Recycled

Handmade Recycled Map Decoration

Real flower bouquets wither – but these handmade, one-of-a-kind floral balls made from recycled pages of old atlases and maps will last forever (or at least a very long time!).

Tuesday, August 14, 2012

Upcycled Note Holder

A wonderfully versatile decoration - a place setting, a photo holder, a note holder, or just a mantle decoration, beautiful in its simplicity.

Light and durable - Great for a study, to hold a momento of a special vacation, a special photo, or words of inspiration.

12 cm high, handmade from the pages of old, unwanted book.

Sunday, April 1, 2012

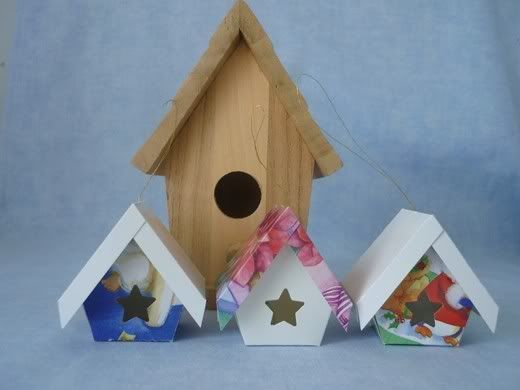
Birdhouses from Greeting Cards

Birdhouses from Greeting Cards

Photobucket

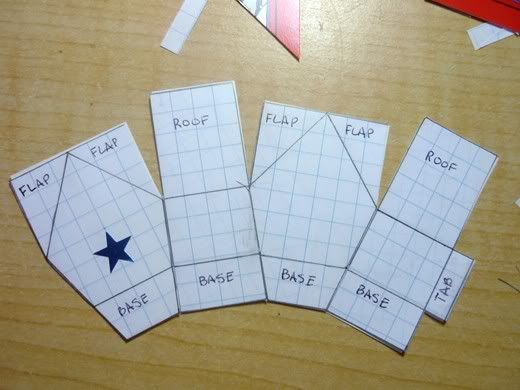
After I had made the greeting card village ornaments I decided that I wanted to make some birdhouse ones. Since the angles for these ones were not as straight forward I couldn't just score the patterns directly on the greeting cards. I made patterns with graph paper first.

If you'd like a pdf version of the pattern for my birdhouses you can click this link. (If you don't have access to a printer you can consult the pattern to draw your own. I drew the four sections of the house on 1/4 inch graph paper and then taped them together.)

After I had made the pattern I taped it to the back of the greeting card front. (This pattern will fit on any card that is larger than approximately 4 x 6 inches.) I took a sharp pin and poked some holes to indicate where the fold lines and the entrance would be. (One mark near either end of every fold line is sufficient.)
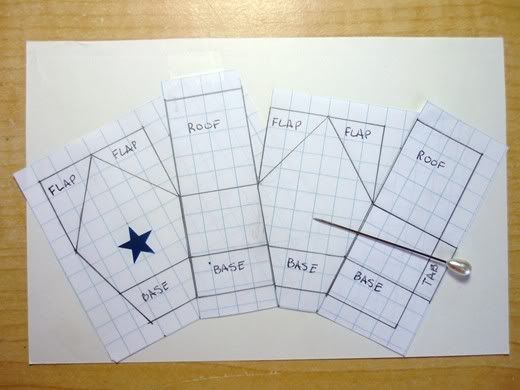
Photobucket

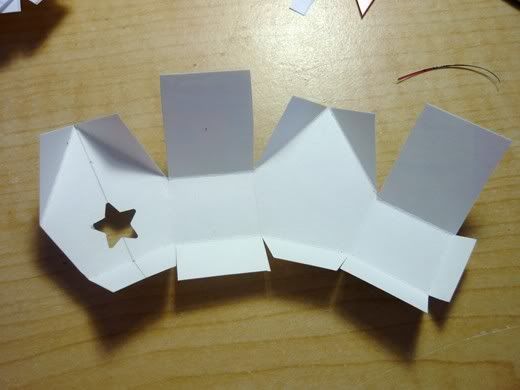
Then I cut around the pattern.

Photobucket

I scored all the fold lines and used a soft pencil to make a line to mark the centre line of the entrance. Then I punched the entrance ...
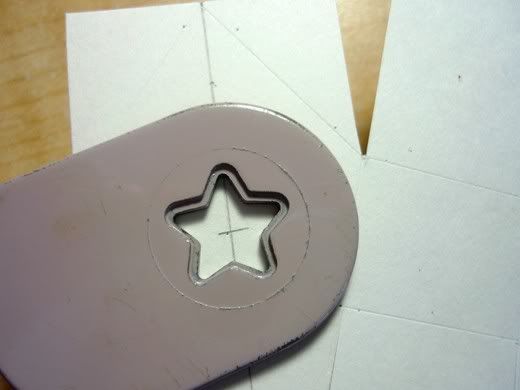
Photobucket

... creased all the fold lines ...

Photobucket

... and placed a piece of double sided tape on the tab.
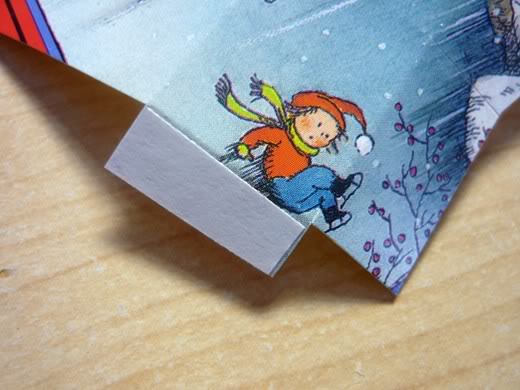
Photobucket

I rolled the house, removed the backing from the tape and stuck the tab to the inside of the front wall. (If I had used use glue instead of double sided tape I would have folded up one piece of the base and used something like a clothespin to clamp the tab to the front wall. Alternatively I could have eliminated the tab and used tape, like I did on the greeting card village ornaments.)
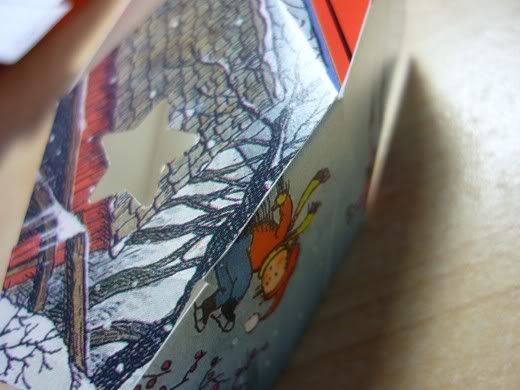
Photobucket

Next I assembled one side of the roof. I used double sided tape to attach the adjacent flaps to the roof piece. (Again if I had used use glue I would have used something like a clothespins to clamp the pieces together.)
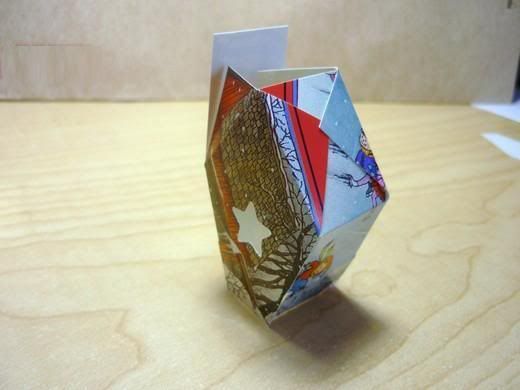
Photobucket

Then I attached the two remaining flaps to the other side of the roof. (If I had used glue I would have laid this side of the roof down on my work surface until the glue was set.)
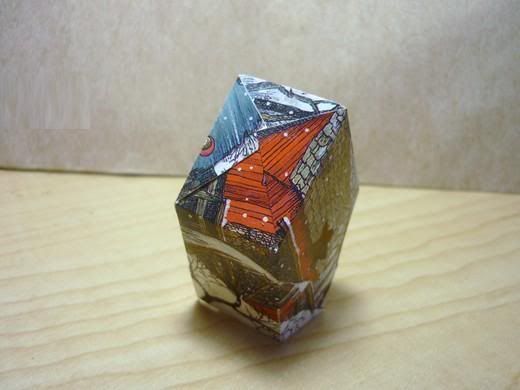
Photobucket

Next I assembled the base. I folded up the two rectangular pieces then used double sided tape to attach the other two pieces of the base. I inserted the handle of a small paint brush in the punched entrance to press the layers together.
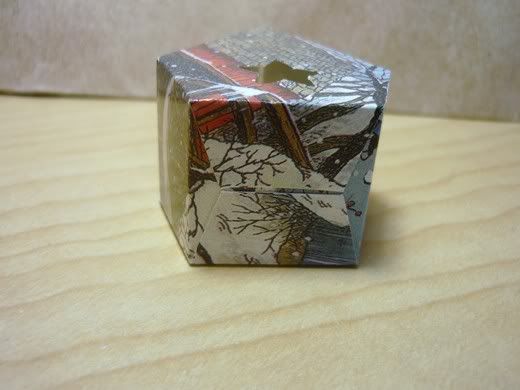
Photobucket

Then I was ready to assemble the outer roof. Because of the simple geometry I could have used my quilt ruler to score the pattern directly onto the back of the card, like I had on the greeting card village ornaments. Instead I taped, marked and cut out the pattern like I had the larger piece of the birdhouse.
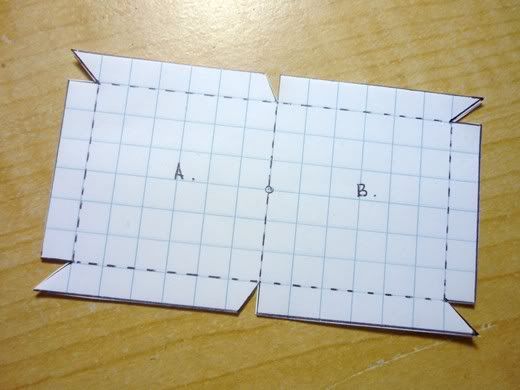
Photobucket

I scored the fold lines. Then I folded the hanging thread in half, knotted the two ends together ...
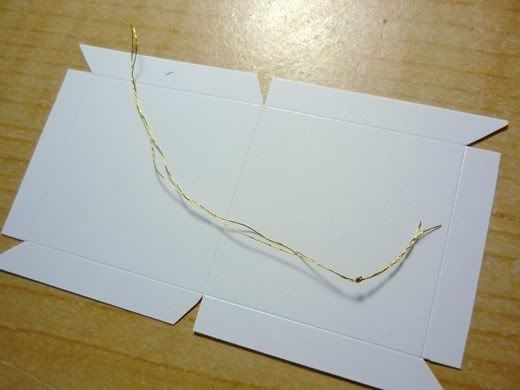
Photobucket

... and used a needle and thread to pull the folded end from the inside to the outside of the roof.
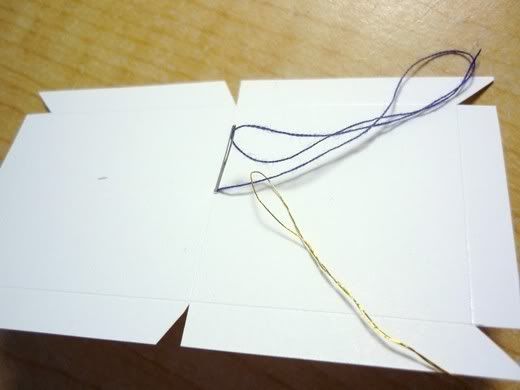
Photobucket

Next I creased the fold lines of the outer roof.
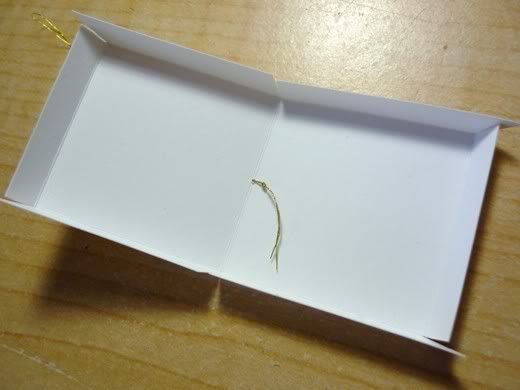
Photobucket

I applied some fast drying glue to one side of the house roof and gently laid it on Side A of the outer roof so that the roof peaks were together and the house was centred. (Side A has the notch at the centre front.) When it was in place I pressed the house against the outer roof. If I had used regular glue I would have left it laying like this until the glue was dry.
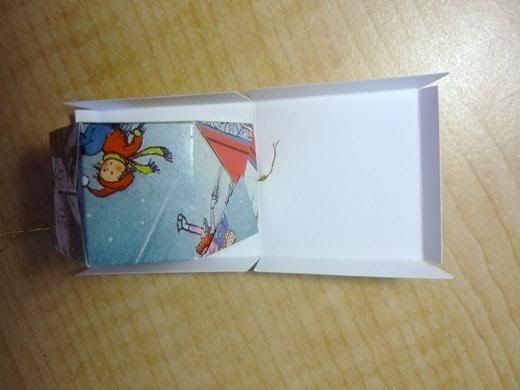
Photobucket

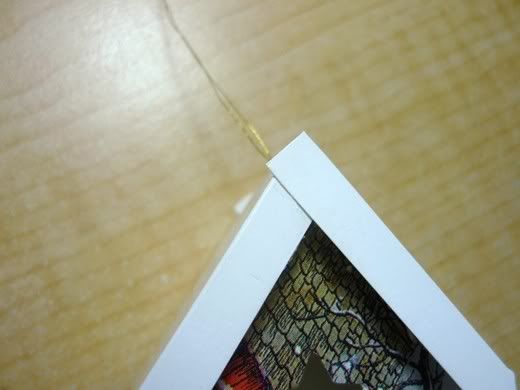
Then I applied glue to the other side of the house roof and pressed the remaining half of the outer roof in place. When the roof was in place there was a bit of the trim extending above the roof. I placed a spot of glue between the two pieces of trim on the front and pressed them together. Then I glued the two pieces of trim on the back of the birdhouse together.
Photobucket

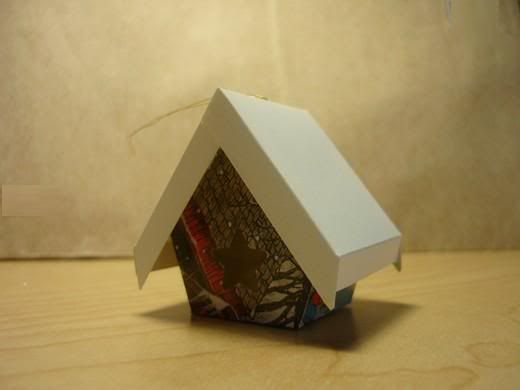
When the glue was set I used scissors to carefully cut the trim flat against the roof.
Photobucket

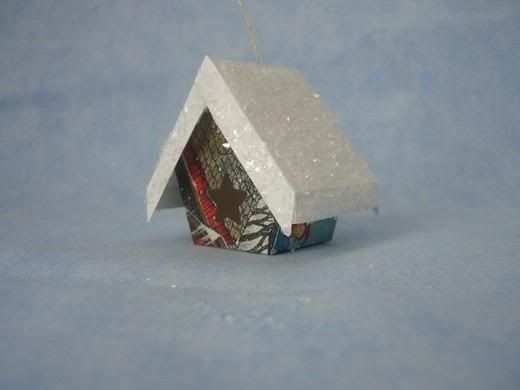
For this birdhouse I decided to add a bit of glitter to the roof. I painted some white glue on the surfaces of the outer roof and then sprinkled the glitter over the roof. When it was dry, and the excess glitter poured back into the container, it looked like this.
Photobucket

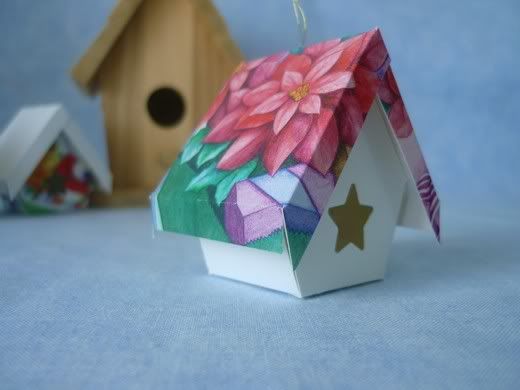
Most of the greeting card birdhouses I have made have had colourful (front of the greeting card) walls and a snowy white (back of the greeting card) outer roof. A birdhouse with white walls and a colourful roof can work well too.
Photobucket

Note. I used the star shaped punch because it was the only one I had that was the right size. If I hadn't had my star punch here are some alternatives I would have tried. Going clockwise the green circle was cut from a greeting card, the small blue circle is a hole made with a regular hole punch, the red star is a sticker and the blue diamond is a hole cut with a mat knife. Another possibility is a 1/2 inch round sticker, which may be found where office supplies are sold.

Wednesday, January 4, 2012

chair hangers

vintage finds for a modern world: no wire hangers!

i love design boom, and they never fail to share with their readers some wonderfully imaginative designs

here is a series of coat hangers created from re-purposed chair backs. transform vintage chairs by adding a wire hanger on top of the chair back transforming it into a simple coat hanger. you can find them at resign. brings all new meaning to no wire hangers!


barn wood - Artist Feature


Great Ideas for Old Barn Wood and More...

Stamp Collage Bird House Small


Stamp Collage Bird House Small
zoom

Stamp Collage Bird House Small Stamp Collage Bird House Small Stamp Collage Bird House Small Stamp Collage Bird House Small Stamp Collage Bird House Small

Stamp Collage Bird House Small

4" w x 5 1/2 " h

Made with found stamps and antique book pages from an old school on the Old West.
Stamps are from around the world in assorted monochromatic colors.

Gothic Wood Block Super Strong Magnets 

~ set of 3

Gothic Wood Block Super Strong Magnets set of 3
zoom
Gothic Wood Block Super Strong Magnets set of 3 Gothic Wood Block Super Strong Magnets set of 3 Gothic Wood Block Super Strong Magnets set of 3
Gothic Wood Block Super Strong Magnets
set of three
2 1/4" x 1 1/4"

decorated with Architectural Gothic photographs and covered with a light acrylic glaze to protect them
2 Owls!

made with upcycled blocks and papers
heavy duty magnets can hold 2-4 sheets of paper!
one of a kind

Reclaimed Barnwood Altered Artwork 

~ 12x14


Reclaimed Barnwood Altered Artwork 12x14
zoom

Reclaimed Barnwood Altered Artwork 12x14 Reclaimed Barnwood Altered Artwork 12x14 Reclaimed Barnwood Altered Artwork 12x14 Reclaimed Barnwood Altered Artwork 12x14

Altered Artwork on reclaimed barnwood with small images of skeleton pieces 
on hard plastic chips nailed to the barnwood.

roughly 12" x 14"

handmade using found images, inks, patterns, nails, plastic and acrylics
no hardware needed to hang


Wine Cork Board Memo Strip Rustic 

~ 5x13


Wine Cork Board Memo Strip Rustic 5x13
zoom

Wine Cork Board Memo Strip Rustic 5x13 Wine Cork Board Memo Strip Rustic 5x13 Wine Cork Board Memo Strip Rustic 5x13 Wine Cork Board Memo Strip Rustic 5x13 Wine Cork Board Memo Strip Rustic 5x13
This is a Wine Cork Board Strip made with upcycled Wine Corks and wood reclaimed from an old farm.

5" x 13 1/2"

Since this item is made with reclaimed materials, dings and "character" is to be expected in the wood and corks.

I hand make each frame, so each one is a little different. Using different corks, rescued from local restaurants. These wine corks came from Luce Enteca Wine Bar in Powell Ohio.
http://luce-enoteca.com/

The board comes ready to hang either horizontally or vertically using the frame itself, no extra hardware, so it will lay flat on your wall.

Perfect gift for the wine lovers or "hard to buy for" people. great to hang above your desk for decoration or to de-clutter your desk of all those post it notes!

Check out Esty Artists like bluegirlink for item like these.
Recycled wine cork memo boards, magnets, artwork, and more.