About Me

My photo
Vermont
Check my shop on Etsy. http://www.etsy.com/shop/UpcycleRecycleReuse

Search This Blog

Showing posts with label Handmade. Show all posts

Saturday, December 1, 2012

Bottles upcycle

Giant Bottle Flowers!

About a year ago I saw this huge bottle flower in Durham, NC. Did not have the camera with me, but promised myself I'd return with a camera. It was a nice cloudy day and I  was close by with some free time and I finally took some photos for your enjoyment. Just might have to get my plumber buddy who enjoys working with scrap steel and a welder make us one of these.
I wondered how the bottles were installed as you do not want water getting inside, the water freezes and breaks the bottles. Now I know the artist welded in lag screws which you screw into corks to hold the bottles in.  believe this is the best bottle art I have seen.... We have enough blue bottles saved to make 6 of these I'd guess.

Washi tape Birdhouse


What about a little DIY birdhouse with washi tape; Easy,quick and so pretty!

Grab a little birdhouse (wood, craft paper will work)some white paint
Your favorite washi tapes
small scissors
and modpodge for the finish (optional)

and in less than an hour, get ready to make a precious little decoration!


Wednesday, November 28, 2012

New Mosaic Stones

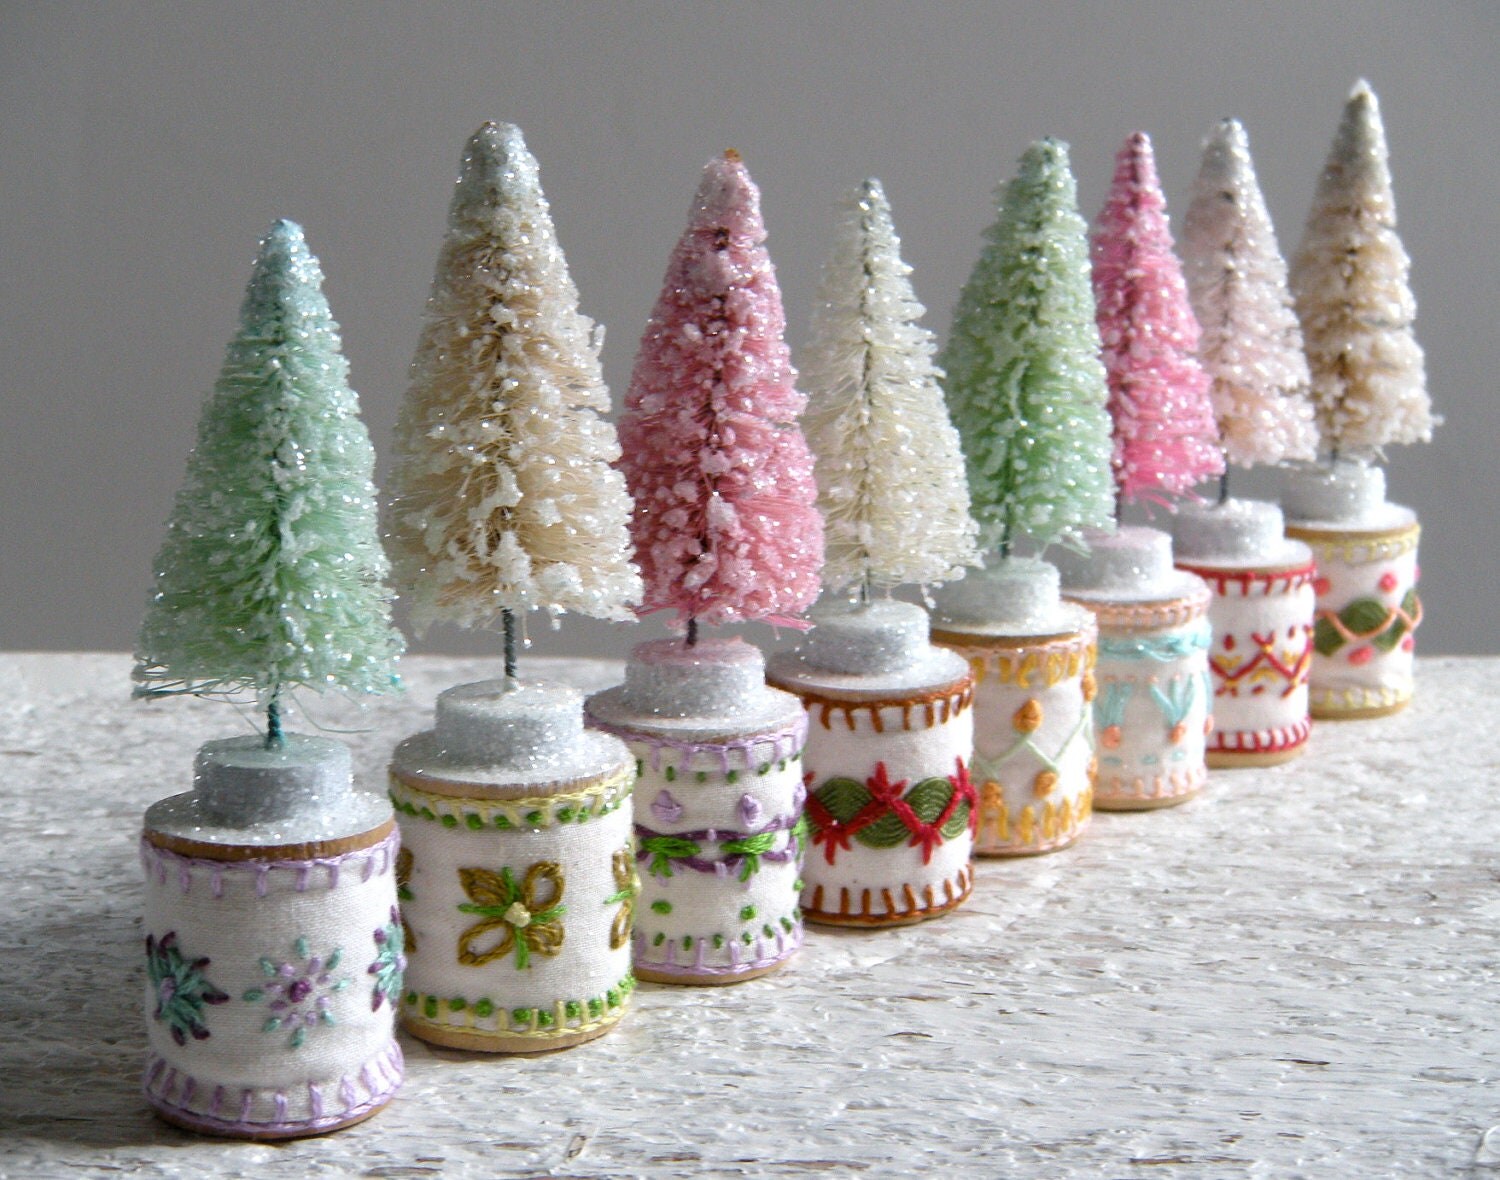
Upcycle - bottlebrush trees

 vintage ~ modern 

Christmas Kitsch

bottlebrush tree - vintage modern christmas kitsch
bottlebrush tree - vintage modern christmas kitsch bottlebrush tree - vintage modern christmas kitsch bottlebrush tree - vintage modern christmas kitsch bottlebrush tree - vintage modern christmas kitsch bottlebrush tree - vintage modern christmas kitsch
(approximately 4 inches tall)

this listing is for one tree only (3 are available)
(see companion listing for the 4 other trees)

a bleached, dyed and glittered bottlebrush tree perches atop a vintage wooden spool

I have hand embroidered the spools using a variety of crazy quilt stitches

Wednesday, November 21, 2012

White Dove Ornaments

DSC_0038 by *lalalaurie
DSC_0038, a photo by *lalalaurie on Flickr.
Simple ornaments for Christmas

The ombre trend - EGST

Συνεχίζουμε με τις τάσεις τις μόδας που εχουν περάσει στην διακόσμηση, σημερα θα αναφερθούμε στο ombre ή αλλιώς την χρωματική διαβάθμιση απο τον πιο σκούρο τόνο ενός χρώματος στον πιο ανοιχτό. Η τάση αυτή έχει φορεθεί πολύ σε κάλσον, μπλούζες αλλά και φορέματα και ήρθε η ώρα να δούμε διάφορους τρόπους για να διακοσμήσουμε το σπίτι μας ακολουθώντας την. 
Continuing our exploration of the fashion trends that crossed over to home decor we find the ombre trend, that gradual variation from a darker color tone to its lighter tone. Ombre has been worn a lot in leggings, shirts and dresses so now we'll see some examples of how we can decorate our home following it.


Ένα εύκολο tutorial θα μετατρέψει το απλό, λευκό φωτιστικό σας είναι η πρώτη μας πρόταση. Χρησιμοποιώντας νήμα και ακολουθώντας τις οδηγίες που είναι αρκετα αναλυτικές θα αποκτήσετε έτσι ένα ξεχωριστό, χρωματιστό φωτιστικό. {εικόνα 1} An easy to follow tutorial using yarn will turn a simple lampshade into a colorful addition to your home. The step to step instructions are very easy to follow, in a few steps you'll have your plain lampshade stand out! {image 1}

Λίγο πιο ειδικευμένο το επόμενο project, μεταμορφώνει μια απλή ξύλινη συρταριέρα βάφοντας τα συρτάρια σε γήινες καφέ αποχρώσεις, ξεκινώντας απο την πιο ανοιχτή για να καταλήξει στο σκούρο καφέ. Συνδυάζει τα χρώματα αυτά με λευκό χρώμα για το "σώμα" της συρταριέρας, δινοντάς της ετσι ένα πιο ανάλαφρο ύφος. {εικόνα 2} The next project is a bit more intricate as it transforms an ordinary wooden dresser by painting the front of the drawers in earthy brown tones, starting from the lighter color and ending in the dark brown one. It combines these colors with a neutral white for the rest of the dresser, giving it a more bright look. {image 2}

Στη συνέχεια χρησιμοποιούμε χρωματιστά χαρτιά για να διακοσμήσουμε ένα πλαστικό δοχείο. Ανακυκλώνουμε έτσι και το δοχείο, κολλώντας τα χρωματιστά χαρτιά σε έντονα χρώματα ξεκινώντας από το πιο ανοιχτό για να καταλήξουμε στο πιο σκούρο. Ανάλογα με το μέγεθός του έχει και διαφορετικές χρήσεις, μπορεί να χρησιμοποιηθεί σαν μολυβοθήκη, σαν σκουπιδοντενεκές. {εικόνα 3) Next we're using colored papers and recycling a plastic container. Cut and glue the paper on the sides of the container starting from the lighter color and ending in the darkest tone and you are done! Depending on the size of the container you can use it to store your pencils or use it as a trashcan {image 3} 
 
Τέλος έχουμε ενα project με άρωμα Χριστουγέννων! Χρησιμοποιούμε ειδικά χρώματα για γυαλί και βουτάμε παλιές γυάλινες μπάλες σε ενα μπώλ που το έχουμε γεμίσει με το χρώμα της επιλογής μας. Η διαδικασία είναι απλή όμως καλό θα ηταν να κάνετε δοκιμές σε γυάλινα βάζα ωστε να μπορέσετε να ελέγξετε καλύτερα το αποτέλεσμα. {εικόνα 4} The final project is a Christmas inspired one! Using special paints for glass, you dip old glass baubles into a little bowl filled with the color you have picked. The process sounds simple enough but it's recommended you try coloring some glass jars first to get the hang of it! {image 4} 

Καλές δημιουργίες!
Happy creating!
 
Source: http://etsygreekstreetteam.blogspot.gr/2012/11/the-ombre-trend.html

Tuesday, November 20, 2012

DIY Screenprint Dodger Tee

DIY Screenprint Dodger Tee

awesome textile diy's 
 A Beautiful Mess' hand stamped dress, a bleach painting tutorial by Lune via A Beautiful Mess. I thought I'd give this screenprint diy, that I saw over at Manzanita, here's my take on this awesome and totally easy project. Here's what you need:
Shirt (thrifted), modge podge, fabric paint (this was my first time using  all-purpose acrylic paint and it's amazing!), design, cardboard piece, embroidery hoop, nylon or panty-hose fabric, paintbrush, and permanent pen.
1. Create a design for your screenprint. I started with something simple since it was my first time using this method. Later, I did a more elaborate design for the front of the shirt, after I did this first heart as practice. Make sure that your that your embroidery hoop is large enough for your design.
2. Stretch the nylon over the hoop so that it is taut.
3. Trace your design using a a permanent pen.
4. Using Mod Podge, paint the "negative space", or, the space that you do not want to be painted.
5. Fill in the whole area, making sure there are no holes or gaps. I was obsessive about this because I didn't want the paint to seep through. Let dry completely. It took about 3 hours for this little one to dry.
6. Lay the hoop flat on the shirt and position where you want the design to be, and place a piece of cardboard beneath the area so that the paint doesn't bleed through the back. Squirt a generous amount of paint over the design.
7. Use the cardboard to spread the paint over evenly.
8. Carefully lift the hoop off the shirt and voila!
9. Let the paint dry completely before wearing.
I also did the front part of the shirt. I made the LA symbol inside a heart. I thought it came out cute and I'm excited to wear it to the game! Go Dodgers!
A few people have commented asking me how I made the design on the front. Here's a picture of the screen I made to create it. I painted Mod Podge on the outside of the heart, and the block letters, basically anywhere I didn't want the paint to go. So you kinda have to think in reverse. Hope this helps!

Wednesday, November 14, 2012

Hanging things doesn't have to be ugly.


Looking for a quick and simple gift? Something that doesn't require a lot of skill and needs no painting? These decoupaged hangers from Ashley at Make It and Love It are perfect for you. Using fabric, hangers from JoAnn's $1 bin and (because there is nothing better) Mod Podge, she whipped these up in no time.

Visit this post for the tutorial; don't forget that you can (and should!) use items from your stash and/or personalize for your recipient. By the way, yes, making hangers with my name on them is weird if there is no one in your house named Amy.

Also Check out

, &  .

Wednesday, November 7, 2012

Netherlands - Upcycled Wood


http://www.designbuzz.com/wp-content/uploads/2012/07/newspaper-wood_tqpRV_41416.jpg

Dutch Designer makes wood out of Newspaper

The ordinary:
Wood has always been used to make paper, but, with new techniques and ingenuity, paper now becomes wood and utilized in different form in many products. The news paper is used as a raw material. Hard texture is given to these newspapers by recycling them and the recycled newspaper is used for making various products. Newspaper Wood is the unique way of using waste material and creating much exciting and useful products out of it. This process of up cycling is the new way to bring life to old dumped recyclable waste.

Inspiration:
A Dutch designer Mieke Meijer worked on this project in her workshop at Eindhoven, Netherlands. Her work is appreciated by a design firm Vij5 and they used this Newspaper wood in creating furniture pieces. Vij5 helped Mieke Meijer in implementing the vital processes into production and marketing. Her work was unnoticed for a period of four years. It was in Milan Design Week 2011, however, the furniture items of this wood were showcased. This process is time consuming, but the end result produce wood like material which has wood grains or rings of trees in a series of layers. It is the creativity of the designer that has transformed dumped newspaper piles into beautiful creations by a simple process of upcycling. Thus, saving the life of so many trees that can be cut down to make wooden items.
The extraordinary:
The newspaper wood created is eco friendly as it utilized the waste newspaper and is of great value. Special machines are used for compressing newspaper by rolling it very tightly to produce log of the size of tabloid. These tabloid logs are quiet similar to real wood in appearance.
The making:
Mieke Meijer, a graduate from the Design Academy Eindhoven made this concept of newspaper wood popular. Certainly, it’s her ideas and hard work that made it possible to create wood from recycled newspaper. The designer glued the stack of newspaper one by one and rolled it very tightly. The wood obtained is slightly deformed and can be sandpapered. So, the end product is the wood which can be cut or sanded and can be transformed into any product just like wood.

Source: http://www.designbuzz.com/dutch-designer-upcycles-discarded-newspaper-into-wood/

Thursday, November 1, 2012

Australia -Creative Upcycling


We live in a throw away consumerist society. Once something that was made for a certain purpose comes to the end of it’s (usually short) life span as ‘something useful’, more often then not it is thrown away. It joins the forgotten others in the forever growing pile of waste that will exist in disregard.

What is Upcycling?

A new term I have stumbled across, that isn’t even in my Oxford American Dictionary is ‘Upcycling’ which Wikipedia defines as
Upcycling is the process of converting waste materials or useless products into new materials or products of better quality or a higher environmental value. The goal of upcycling is to prevent wasting potentially useful materials by making use of existing ones.
The opposite of upcycling is downcycling which involves converting materials and products into new materials of LESSER quality.

Ethikl

Ethikl is a marketplace for ethically sourced, handmade and fair trade products sold directly by the producers. All of the products are one-of-a-kind pieces from gourmet food to handmade jewellery. You won’t find anything mass produced and social networking features on the site allow people to meet the makers of all the amazing ethical products, providing a way to make buying decisions that favour fair trade, cruelty free, organic, recycled, handmade or local.
VelvetBean's cat Sash. About as close to animal testing as it gets!

VelvetBean

VelvetBean is one of the producers on Ethikl who sews together feature cushions made from upcycled burlap sacks that were previously used to transport green coffee beans around the world and were destined for the landfill.
The sacks are immersed into a warm bubble bath and left to soak the stresses of their previous life away. They are then air dried, cut and sewn into stunning feature pieces just waiting to take pride of place in your home.


Velvet Bean: ‘Home Beautiful Magazine Australia’ as a giveaway  in 2010 to For Greenies readers.


To help you get your creative juices flowing here are some examples of DIY upcycling
Creating lawn furniture from old pallets
Create a wallet from a bike tyre inner tube
Creating baby slippers out of old wool sweaters and leather jackets

Wednesday, October 10, 2012

Upcyceld Tin Cans - Art inspired


We all use some canned foods from time to time.  And we all probably use empty cans for one purpose or another.  This inscrutable shows how to decorate cans to be used as organizers for pencils, pens, paint brushes, etc.  It's a simple thing to do, and children would especially have fun making their creations.

Can Art: A Way To Recycle Some Tin Cans


1.      Prime the cans so the glue sticks
2.   Make the tiles. I painted Styrofoam and cut it into tile shapes. (Use whatever you have at hand.)
3.      Glue tiles to primed can
4.      Grout spaces between tiles and wipe off excess.

Tutorial:
http://www.instructables.com/id/Can-Art-A-Way-To-Recycle-Some-Tin-Cans/#step1

Saturday, September 22, 2012

MOSAIC Stained Glass Fish Candle Holder

 UPCYCLED JAR


*With the holidays coming up, this would make an awesome one of a kind gift.
No more awkward moments of "thanks for the lovely socks, again."

*It is covered in Hand Cut Stained Glass, the fish is purple with orange fins and tale. The rest is covered in blue with the hopes of resembling water.


*It could be used as a candle holder, pen holder, or even cotton ball holder-
whatever your heart's desire

http://www.etsy.com/listing/76106838/mosaic-stained-glass-fish-candle-holder