


Simple ornaments for Christmas

Upcycle, Recycle, Reuse is where old products are given more value not less. The goal of this shop is to prevent wasting potentially useful materials by making use of existing ones. The posts on this blog are mostly of others who follow the same creed. Check out all the great finds!
About Me

- Upcycle, Recycle, Reuse
- Vermont
- Check my shop on Etsy. http://www.etsy.com/shop/UpcycleRecycleReuse
Showing posts with label christmas. Show all posts
Showing posts with label christmas. Show all posts
Wednesday, November 21, 2012


The ombre trend - EGST
Συνεχίζουμε
με τις τάσεις τις μόδας που εχουν περάσει στην διακόσμηση, σημερα θα
αναφερθούμε στο ombre ή αλλιώς την χρωματική διαβάθμιση απο τον πιο
σκούρο τόνο ενός χρώματος στον πιο ανοιχτό. Η τάση αυτή έχει φορεθεί
πολύ σε κάλσον, μπλούζες αλλά και φορέματα και ήρθε η ώρα να δούμε διάφορους τρόπους για να διακοσμήσουμε το σπίτι μας ακολουθώντας την.
Continuing our exploration of the fashion trends that crossed over to home decor we find the ombre trend, that gradual variation from a darker color tone to its lighter tone. Ombre has been worn a lot in leggings, shirts and dresses so now we'll see some examples of how we can decorate our home following it.

Ένα εύκολο tutorial θα μετατρέψει το απλό, λευκό φωτιστικό σας είναι η πρώτη μας πρόταση. Χρησιμοποιώντας νήμα και ακολουθώντας τις οδηγίες που είναι αρκετα αναλυτικές θα αποκτήσετε έτσι ένα ξεχωριστό, χρωματιστό φωτιστικό. {εικόνα 1} An easy to follow tutorial using yarn will turn a simple lampshade into a colorful addition to your home. The step to step instructions are very easy to follow, in a few steps you'll have your plain lampshade stand out! {image 1}
Λίγο πιο ειδικευμένο το επόμενο project, μεταμορφώνει μια απλή ξύλινη συρταριέρα βάφοντας τα συρτάρια σε γήινες καφέ αποχρώσεις, ξεκινώντας απο την πιο ανοιχτή για να καταλήξει στο σκούρο καφέ. Συνδυάζει τα χρώματα αυτά με λευκό χρώμα για το "σώμα" της συρταριέρας, δινοντάς της ετσι ένα πιο ανάλαφρο ύφος. {εικόνα 2} The next project is a bit more intricate as it transforms an ordinary wooden dresser by painting the front of the drawers in earthy brown tones, starting from the lighter color and ending in the dark brown one. It combines these colors with a neutral white for the rest of the dresser, giving it a more bright look. {image 2}
Στη συνέχεια χρησιμοποιούμε χρωματιστά χαρτιά για να διακοσμήσουμε ένα πλαστικό δοχείο. Ανακυκλώνουμε έτσι και το δοχείο, κολλώντας τα χρωματιστά χαρτιά σε έντονα χρώματα ξεκινώντας από το πιο ανοιχτό για να καταλήξουμε στο πιο σκούρο. Ανάλογα με το μέγεθός του έχει και διαφορετικές χρήσεις, μπορεί να χρησιμοποιηθεί σαν μολυβοθήκη, σαν σκουπιδοντενεκές. {εικόνα 3) Next we're using colored papers and recycling a plastic container. Cut and glue the paper on the sides of the container starting from the lighter color and ending in the darkest tone and you are done! Depending on the size of the container you can use it to store your pencils or use it as a trashcan {image 3}
Τέλος έχουμε ενα project με άρωμα Χριστουγέννων! Χρησιμοποιούμε ειδικά χρώματα για γυαλί και βουτάμε παλιές γυάλινες μπάλες σε ενα μπώλ που το έχουμε γεμίσει με το χρώμα της επιλογής μας. Η διαδικασία είναι απλή όμως καλό θα ηταν να κάνετε δοκιμές σε γυάλινα βάζα ωστε να μπορέσετε να ελέγξετε καλύτερα το αποτέλεσμα. {εικόνα 4} The final project is a Christmas inspired one! Using special paints for glass, you dip old glass baubles into a little bowl filled with the color you have picked. The process sounds simple enough but it's recommended you try coloring some glass jars first to get the hang of it! {image 4}
Καλές δημιουργίες!
Happy creating!
Source: http://etsygreekstreetteam.blogspot.gr/2012/11/the-ombre-trend.html
Tuesday, December 6, 2011
St. Nicholas Day - 6th of December
Nikolaustag - St. Nicholas Day - 6th of December. On this day the white-bearded St. Nicholas (not Santa Claus) brings gifts to children who left their shoes in front of the door the night before. Ideas for the holidays.
Christmas stocking


This is a beautiful big Christmas stocking!Gorgeous to enjoy for many years to come!Wonderful addition to your holiday deco!Measurements: approx. 17 x 12 inches.
Catholic Saint Doll Toy - St Nicholas - Wooden Peg Doll - Made to Order


***This item will be made after purchase. Please allow up to two weeks for shipment. This item will resemble the photos essentially but will be different and therefore one of a kind. If you wish to have a photo sent before it is shipped just notify me.***
This is a little 3 1/2 inch tall peg doll of St. Nicholas.
He is painted as a Bishop holding a miter in one hand and a bishop's crook in the other. At his feet is another sprig of holly and three bags of gold due to the money he gave to a man to save his three daughters from slavery. This doll is painted with non-toxic permanent acrylic paint and non-toxic sealer.
Sunday, December 4, 2011
craft a christmas box for cookies or more - a tutorial
Gift Box Tutorial
I hope everyone is having a wonderful weekend. Today's project is from Pam Callaghan, one of our talented design team members. She created a great gift box tutorial using our new paper collection, English Garden. As lots of you are gearing up for graduations and weddings, this beautiful box will come in handy for those special little gifts.
Embellished Gift Box Directions
1. Print and cut out template (print template). Make sure you print in the right orientation so it fits on almost the entire sheet. The dotted lines are for folding and the solid lines are for cutting. Carefully cut out the image. Make sure you cut up the bottom solid line-that will serve as the bottom flaps of the box.
2. Using a pencil, trace your template onto your patterned paper. Marks Paper Company’s double sided paper works great because the inside of the box will be patterned as well. Here you can see I want the purple and white paper as my outside.
3. Do the same cutting that you did on the white template. Remember the solid lines are for cutting and the dotted lines are for folding. Make sure you only cut out the solid lines on your box.
4. Fold your box where the dotted lines would be. You can reference your original white template to get an idea of where to fold. You are going to be folding inward just as I did in the photo below. It should fold quite easily if you cut in all the right places. Make sure you make good creases in your paper in order for the box shape to keep well.
5. Fold your box like the photo below. You are going to fold the outer flap inside the box. Put some glue on the flap and press firmly for it to hold. The creases on the folds should guide you on how to fold your box.
6. Fold the bottom flaps up and glue the last three to each other. Do not put glue on the top of the very first flap because your gift will stick to your box. You can use tape to secure the flaps in place. When finished, embellish as desired. The new die cuts and covered buttons work great for the box!
You are done!
Enjoy!
Saturday, December 3, 2011
origami stars christmas ornaments
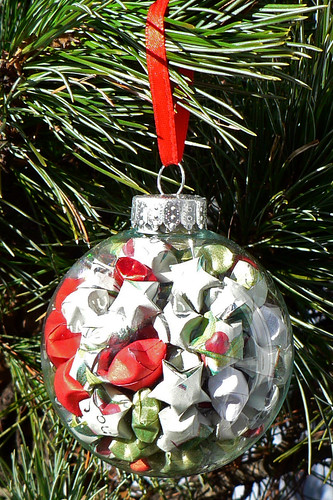
 Origami Lucky Stars: I'm partial to these, and they're so simple to make. Cut your paper into strips, then follow the directions on Foldastar.com. Once folded they can be used to make a garland, or fill a hollow ornament. They look great in jars too! I made this garland for my sister , it uses Sephora holiday catalogs, delica seed beads, green ribbon and beading cord.
Greeting Card Garland:
For this project I used a 1" circle hole punch (any symmetric shape will work), ribbon, a glue stick, 2 greeting cards and an envelope liner (the pretty silver paper).
Or Make Christmas Ornaments....
Friday, December 2, 2011
DIY Christmas Wreaths
Eco-Friendly DIY Christmas Wreaths
Christmas is approaching fast and you are likely to be already trying to figure out how to make this year's holidays frugal and eco-friendly while still fun.
We save money and we love our home, therefore we love our DIY life!
So here are three totally green and pretty easy-to-craft DIY projects for you to decorate your home on a budget:
Find the instructions here.
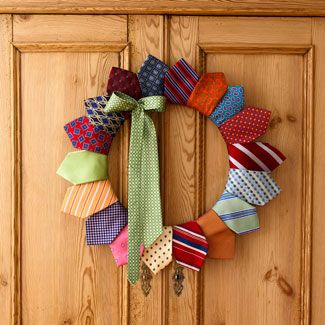
Old Ties into the Christmas Wreath
I am sure you have plenty of those ties your husband or dad doesn't need any more.
Why not turn them into the fun Christmas decoration?
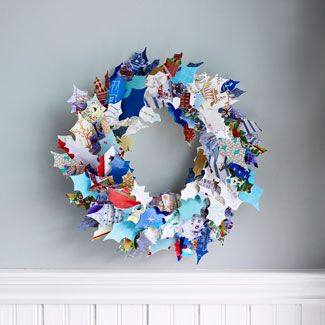
Holiday Greeting Cards into the Christmas Wreath
Recycle your friends' holiday greeting cards into holly leaves for this nice Christmas wreath!
That's what I call putting good wished to real use!
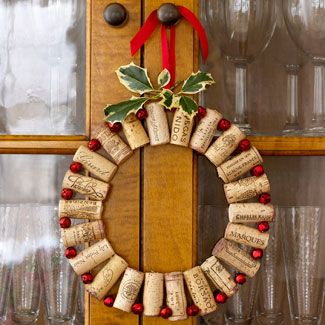
Recycle Wine Corks into the Christmas Wreath
Holidays are so rich in wine, so this year you will know how to recycle them!
Pst, here are few more ideas to recycle festive wine corks:
Wednesday, November 30, 2011
Decorate a Festive Wreath
For one wreath you will need:
Cardboard (pizza box tops work great)
A dinner plate and a slightly smaller round stencil
Pen or pencil
Box cutter
Mod Podge or other craft glue
Decorative paper scraps (leftover wrapping paper, tissue paper or florist paper)
Paintbrush
Assorted greeting cards
Directions:
1) Use the plate to stencil a circle onto the cardboard. Center a smaller stencil inside the first circle, and trace around it with a pen or pencil. Cut out the circles with a box cutter to make a cardboard ring.
2) Cut the scrap paper into 1 inch squares. Using the paintbrush, spread a bit of mod podge onto the cardboard ring. Place a square of paper over the glue, then brush with a thin layer of mod podge to smooth.
3) Continue adding squares of paper until the entire ring is covered, over lapping each square slightly. Add 2 or more layers until the cardboard no longer shows through. Allow each layer to dry before adding the next one.
4) Cut assorted festive shapes from the greeting cards. Arrange the pieces on the wreath until you are satisfied with the design. Apply the card shapes to the wreath with mod podge, and allow to dry.
5) Decorate the wreath with glitter if you wish, and hang from a door or window with a push pin.
You can also attach a string to the wreath for easy hanging. Simply staple a length of string to the back of the cardboard ring before adding the paper squares. Cover the staples with paper as you work to secure them.

Tuesday, November 29, 2011
Christmas-on-a-budget Upcycled Ornaments
There have been recycled craft ideas for as long as there have been elementary schools. Perhaps these teachers of our youths have got it right. The world is slowly (okay, very slowly) turning green. Here in Canada, recycling is becoming an every increasing part of life. My toddler even knows better than throwing away her yogurt container. But what if these items were removed from the recycling chain all together and made into something completely different. Recycling takes a certain amount of energy and resources as well. Perhaps these energy and resources can also be saved by upcycling our trash into items that we can use.
The economic crisis is definitely casting a shadow over the holiday season. Upcycling can also be used as a way of saving money. If you could take your family’s cast offs and turn them into something useful, you could definitely save a few bucks while also educating your family on the need to be environmentally responsible.

Image Source
Christmas cards are a great source of a raw art material. Here the cars have been painstakingly cut, folded and pasted together to form a three dimensional star shape with an array of colours.

Image Source
This project also involves used Christmas cards cut, folded and pasted together into balls. This could also be made out of sheet music, birthday cards or even colourful pieces of magazines or boxes.

Image Source
In this example, the process of remaking the cards into something else is simplified. Even kids could be involved in the making of these ornaments which are dictated more by the design of the card than anything else. While these may be simple, they would surely liven up a Christmas tree or present.

Image Source
These creatively painted burned out bulbs are looped with beaded wires to hang them on the tree branches. I especially like the Grinches on either side of the photo. This shot in particular shows the process of upcycling. Burnt out bulbs are considered garbage while these creatively painted bulbs could surely be sold quite easily at any craft show.

Image Source
These old spoons have also seen the hand of a creative painter. Bending the ends of the spoon over to hang them from tree branches is an exceptionally great idea that I surely would have never thought of! I really like the penguins on this one.

Image Source
This picture shows how a painted baby food jar can be placed over a light bulb and transformed into a snowman lit from within. This tiny Frosty the snowman is super cute and won’t even melt!

Image Source
This picture shows a craft made by kids in Africa. Flattened bottle caps are strung together to form these Christmas balls.

Image Source
This funny tree is full of squished pop or beer cans painted white. The spout of the can makes a really cute mouth for the snowman.
The economic crisis is definitely casting a shadow over the holiday season. Upcycling can also be used as a way of saving money. If you could take your family’s cast offs and turn them into something useful, you could definitely save a few bucks while also educating your family on the need to be environmentally responsible.
Image Source
Christmas cards are a great source of a raw art material. Here the cars have been painstakingly cut, folded and pasted together to form a three dimensional star shape with an array of colours.
Image Source
This project also involves used Christmas cards cut, folded and pasted together into balls. This could also be made out of sheet music, birthday cards or even colourful pieces of magazines or boxes.
Image Source
In this example, the process of remaking the cards into something else is simplified. Even kids could be involved in the making of these ornaments which are dictated more by the design of the card than anything else. While these may be simple, they would surely liven up a Christmas tree or present.
Image Source
These creatively painted burned out bulbs are looped with beaded wires to hang them on the tree branches. I especially like the Grinches on either side of the photo. This shot in particular shows the process of upcycling. Burnt out bulbs are considered garbage while these creatively painted bulbs could surely be sold quite easily at any craft show.
Image Source
These old spoons have also seen the hand of a creative painter. Bending the ends of the spoon over to hang them from tree branches is an exceptionally great idea that I surely would have never thought of! I really like the penguins on this one.
Image Source
This picture shows how a painted baby food jar can be placed over a light bulb and transformed into a snowman lit from within. This tiny Frosty the snowman is super cute and won’t even melt!
Image Source
This picture shows a craft made by kids in Africa. Flattened bottle caps are strung together to form these Christmas balls.
Image Source
This funny tree is full of squished pop or beer cans painted white. The spout of the can makes a really cute mouth for the snowman.
With a little creativity and ingenuity, people can save money during the holiday season. These few examples of handmade, upcycled ornaments are literally just a drop in the bucket in terms or recycled ornament ideas. There are thousands and thousands of decorating ideas
out there.
Here is a link to other great ornament ideas I have found.
upcycle-recycle-reuse.blogspot.com/search/label/ornaments
Here is a link to other great ornament ideas I have found.
upcycle-recycle-reuse.blogspot.com/search/label/ornaments
Upcycled Button Ornaments

I saw this piece on Curbly.
Styrofoam ball of any size.
Straight pins. (the kind you find in the sewing department)
Buttons!
Going multi color here sounds like a great idea.
The contrasting colors on the overlapping pieces is perfect!
To top this off, try taking a small piece of wire (jewelry wire, floral wire, anything) and making an upside down "U" shape with it. Stick the ends into the ball and add a dot of glue to keep them in place. Tie a ribbon bow onto your "U" to hide the wire, and add a hanger from there.
There are 4 other button ornament ideas on that website as well!


Thursday, November 24, 2011
Upcycled Ornaments - Spools and more...
Bored of the old ornaments? Paint something on it! :)

 Ornaments gallore....

And here are a few more ideas ro be found at cattales ..... 
Wednesday, November 23, 2011


Subscribe to:
Posts (Atom)